Art and its Homes, Main

10 Secrets To Improve Your Drawing Skills

Are you an artist looking to improve your drawing skills? There are a few secrets to drawing that can help you improve your artwork. These simple life hacks can open up a new world of creativity and self-expression. Read on to learn more!

1. Fill a Sketchbook With Freehand Doodles

There’s no better way to improve your drawing skills than to fill a sketchbook with freehand doodles! By working on your drawing skills every day, you’ll quickly see a noticeable improvement in your abilities.

Plus, it’s a lot of fun to experiment with different drawing styles and techniques. So grab a sketchbook and some pencils and get started!

2. Trace

If you want to improve your drawing skills, one of the best things you can do is to trace images that you admire. Not only will this help you better understand the construction of the image, but you’ll also get a feel for the artist’s style.

When you’re tracing, be sure to use a light touch so that you can see the lines underneath. This will help you better understand where the lines should go when you’re drawing on your own.

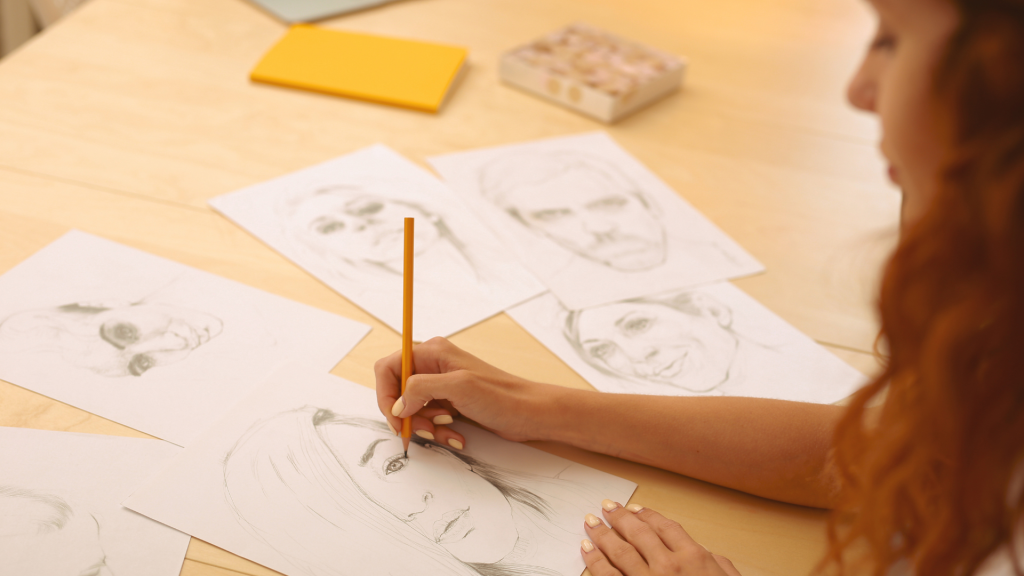
3. Use Reference Photos

As an artist, using reference photos is a great way to improve your drawing skills. By studying the shapes and proportions of real-life objects, you can learn how to better depict them in your drawings.

By observing the way light falls on a subject, you can also create more realistic drawings. Also, looking at reference photos can give you ideas for new compositions. It can help you practice drawing a variety of different subjects.

Of course, you don’t want to rely on reference photos all the time. Part of being a good artist is being able to improvise and create something from your imagination. But when you’re just starting, or if you’re struggling with a particular aspect of drawing, reference photos can be a big help.

4. Choose the Right Paper

The type of paper you use can have a big impact on your drawing skills. If you choose the wrong paper, it can be difficult to get the results you want.

This is why it’s important to choose the right paper for your needs. By doing so, you’ll be able to improve your drawing skills and create the masterpieces you’ve always wanted.

5. Learn To See the Values

If you want to improve your drawing skills, one of the best things you can do is learn to see the values. The value is the lightness or darkness of a color.

To create the illusion of a three-dimensional form on a two-dimensional surface, you need to use values. By contrast, adding details without first establishing the values will result in a drawing that looks flat and lifeless.

One way to start seeing values better is to squint at your subject. This will help to blur the details and make the values more apparent. You can also try using a black-and-white photo as a reference.

Once you start to see the values, you can start to add them to your drawing. Begin by blocking the darkest areas with a pencil or charcoal. Then add the mid-tones and finally the lightest areas. By working from dark to light, you will create a sense of depth and volume in your drawing.

6. Focus On Drawing Shapes

One way to improve your drawing skills is to focus on drawing shapes. This will help you to see the world in terms of basic shapes and will make it easier for you to create accurate drawings.

Start by looking for simple shapes in the world around you and then practice drawing them. Remember to vary the size and orientation of the shapes to keep your drawings interesting. As you become more comfortable with drawing shapes, you can begin to add more details to your drawings.

7. Stay Loose

” Stay Loose” is an important concept for artists of all skill levels. When thinking about improving your drawing skills, it is important to remember to stay loose. By staying loose, you allow yourself to be more spontaneous and expressive in your work.

This can lead to better and more expressive drawings. So, if you are looking to improve your drawing skills, remember to “stay loose!”

8. Avoid Smudges

If you want to improve your drawing skills, avoid smudges. When you smudge your drawing, it can make it look messy and unprofessional.

Plus, it can be difficult to fix smudges once they’re made. So, if you want to avoid making mistakes and create neat, clean drawings, make sure to avoid smudges.

9. Learn Drawing Skills

If you want to improve your drawing skills, one of the best things you can do is learn some new drawing skills. You can do this by taking classes, reading books or articles on the subject, or practicing on your own. By learning new skills, you will be able to improve your current skills and become a better drawer.

10. Practice

When it comes to drawing, practice does make perfect. The more you practice, the better your skills will become. Even if you don’t feel like you’re getting any better, keep at it and you’ll see the improvement in time.

One way to practice and improve your skills is to take a sketchbook with you everywhere you go. Draw people you see on the bus, in the park, or in line at the grocery store. Don’t worry about getting it perfect, just focus on getting the proportions and features down.

Another way to practice is to find still-life objects and draw them. This can be anything from a simple bowl of fruit to a more complex arrangement. Again, don’t worry about getting it perfect, just focus on capturing the subject matter accurately.

The more you practice, the better you’ll become at drawing. So keep at it and soon you’ll be impressing everyone with your skills!

Art and its Homes, Main

How to Draw Hair

Drawing hair can be tricky, particularly because hair comes with such variation, from Medusa’s tightly curled rope-like hair to long dreamy locks like Rapunzel’s. But we’re here to help! This article will teach you how to draw hair, along with a lot of helpful tips and techniques.

The Basics

To draw hair, you actually need a very good understanding of physics. You need to know exactly how hair absorbs and reflects light in different environmental conditions, and you need to understand how gravity changes the way hair falls. When Pixar first started animating films, the hardest thing for them to animate was human hair due to its complex interaction with the world around it. Drawing hair is much the same.

Curly Hair

Curly hair can be a blessing and a curse in more ways than one. Curly hair reflects light beautifully, but drawn wrong and it’ll look like a mess of coiled springs. First, determine the direction of light. Curly hair is more three-dimensional due to the bouncy, cylindrical curls, so playing with the lighting is what will help to make it look 3D. Poor lighting will make the strands look flat, which is the opposite of what you want. Avoid the temptation to draw clumps of hair in one curly mess – each curl needs to be defined, so it might take a while to get it right.

Frizzy or Permed Hair

It’s a little easier to draw frizzy and permed hair due to the difference in light absorption. Frizzy and permed hair is damaged, meaning it absorbs less light and can look dull in certain conditions. You won’t need to worry so much about how light shines off it, and you can afford to be a bit messier. Some strands of hair will also be sticking out at odd angles, so a misplaced hair or two will help to reach the desired effect.

Layered Hair

Drawing layered hair, no matter the texture, relies on drawing in sections. Start by drawing a base layer, and build on this until you reach the top layer. Remember, there will always be more hair at the back of the head where layers lie on top of each other that at the top of the head where hair falls straight down. Similarly, there will be less hair at the tips than the roots unless the hair is cut straight across.

Straight Hair

This is usually the easiest hair type to draw, but there are some important things to consider. Straight hair tends to be finer than curly hair, so you need to be careful not to be too heavy-handed. One harsh line and the effect will be lost, so stick to light pencil strokes. Straight hair also tends to flow and is effected heavily by gravity, so if there’s even a slight head tilt, the direction of flow needs to reflect this. Keep your pencil strokes long and fluid, and avoid short, sharp lines. This will give the impression of a head full of split-ends, so unless this is what you want, keep your strokes long!

No matter which hair type you are drawing, it’s important to remember two things: direction of light and the effect of gravity. Of course, the tips above are all for dry, styled hair, but things change dramatically if hair is wet, exposed to wind or un-styled. Drawing hair in these conditions requires further knowledge of physics, so if you’re a bit rusty on your school science topics, it might be worth studying a bit more! The more you understand, the more realistic your drawings will look. Keep practicing and, pretty soon, people won’t be able to tell the difference between a photograph and your artwork!

Art and its Homes

How Does Henna Pattern Differ in India, Africa, and the Middle East?

Henna is a plant that has been used for thousands of years as a natural dye to decorate the skin. Today, it’s usually used to color hair, although it’s also occasionally used to draw patterns on the skin. Henna comes from a perennial shrub that grows in tropical and subtropical climates, and it’s used in countries like India, Morocco, Egypt, and Pakistan. Its leaves have been ground into a powder used as a coloring agent. Many people also drink tea made from leaves.

What Does Henna Mean?

Henna, also known as Mehndi or Henna, is a plant that produces a dye used to create body art. The color of the dye depends on the plant and the color produced. Women in the Middle East have used henna for thousands of years. They would use the dye by wrapping it in cloth and applying it to their hands and feet as a form of body decoration. Henna has now become commonly used for body art. It is beneficial to your health. Henna is used as a medicine to help people who have conditions like skin rashes. People also use henna to help with headaches, cramps, joint pain, blood clotting, and skin infections.

Henna Pattern in India

Henna is an ancient Indian tradition, but henna is also finding its way into some more modern lifestyles. It is a paste made of dried leaves and flowers of the henna plant, which is traditionally used as a dye for skin, hair, and fingernails. When henna is applied to the skin, it stains the skin and hair. It also stains fabric. Some people use henna to color their hair, creating a temporary color that will wash out after shampooing.

Henna has been known for her beauty for ages. They have been used since ancient times, especially at weddings. Henna art in India is a task that is counted among the most beautiful art. Henna artists in India use natural henna sourced from henna plants.

Henna Pattern in Africa

Henna is a cosmetic additive that’s used to color the skin, hair, and nails. It has been a favored cosmetic for many cultures around the world, including Egypt, India, and the African Continent. Henna was widely used and readily available throughout Africa. Henna was both used to decorate the body and as a medicinal cosmetic. It was traditionally prepared by crushing and pounding the leaves and twigs of plants of the Aizoaceae family in the bush (Zinn, 2010). The powdered leaves were mixed with a paste of water and vinegar and then applied to the skin using a stick or massage brush. Henna was also applied to the hair. After washing, a paste containing henna and water was sometimes applied to the hair. Henna also was also used as a dye to color fabric.

Henna Pattern in the Middle East

Henna is a form of temporary body art that originated in the Middle East. Henna paste is made of dried, powdered leaves from the henna shrub. Henna paste is mixed with water, made into a paste, and applied to the skin using a natural rubber stamp. Henna leaves have been used as a dye for fabric since ancient times. Once applied, the paste dries on the skin, turning the skin a temporary shade of red. Over the course of a few hours, the henna paste fades, and the skin returns to its normal color.

In the Middle East, henna also referred to as mehndi, has been used for beautification for centuries. Henna is a plant that has been grown in certain regions of the world for hundreds of years. It’s growing in popularity with millennials and is part of many festivals. Henna is a plant that has been grown in certain regions of the world for hundreds of years. It’s growing in popularity with millennials and is part of many festivals.

Henna tattoos have been around for thousands of years, originating in the Arabian Peninsula. The decorative art form was reserved for kings and queens in ancient times, but today it is gaining in popularity. Such tattoos come in a wide variety of designs, colors, and colors and can be applied to almost any part of your body.

Art and its Homes, Main

How To Become Better at Art?

Art has always been an inspiration and an outlet for creativity. But your passion for the arts may lead you away from college before you realize it, and today’s growing job market requires you to have skills in more than one area. So, how can you use arts classes to get into college, develop skills that will make you more marketable, and prepare you for a career?

As anyone who has taken an art class knows, no art ability is zero art ability. Sure, you might have to learn how to draw a contour line before you can mix colors, but whatever you draw or paint, it will still be a piece of art. Even the best artists still have work to improve. If you’ve been inspired to take an art class, here’s how to improve your art skills.

Get motivated

If you want to be better in art, then the first thing you need is motivation. Then you need to hone your skills in the art. If your skills are sharp enough, you can become really good. Secondly, you need to master the art of art appreciation. This is the most crucial point because you must appreciate art for the art’s sake. Art appreciation leads to artmaking, and when you master artmaking, you can become a great artist.

Find inspiration

Finding inspiration to get better at art can be a tricky thing. Inspiration can be found anywhere and everywhere, and all you have to do is take the time to find it and put that inspiration to use. So, what inspired you to start drawing and painting in the first place? What inspired you to pick up the brush, pencil, or paintbrush? What was the image that fascinated you so much that you had to draw it? Inspiration can come from anywhere and everywhere, from the colors in the world around you to the colors in your child’s artwork.

Find your weak points and work on them.

We all have weak points. Some of us are pretty good at drawing faces, others at drawing landscapes, while others might be good at drawing people. But by identifying your weaknesses and improving on those skills, you can become a better artist. It’s important to figure out what your weak parts are as an artist because there are so many things that can be improved upon.

Use references

Art is subjective, and it can be really hard to tell whether or not you’re improving, especially if you have no frame of reference. After all, weren’t we all beginners at some point, only to get better over time? We used to struggle to get charcoal onto the paper or to position the brush before free handing the lines correctly.

The act of drawing and painting takes practice. If you can see someone drawing or painting the screen of your smartphone and think that it’s as easy as that, you’re so wrong. It takes time to become good at drawing and painting. While there are some people who are natural artists, most people aren’t. It takes practice. And the best way to practice is to see examples of what other artists have done.

Practice a lot 

If you really want to get better at art, whether you’re practicing drawing, painting, or sculpting, you’re probably going to have to put your head down and practice a lot. If you’re going to spend this time practicing your craft, you might as well make the most of it by practicing effectively. That way, you can spend less time practicing and more time making art.

Art and its Homes, Main

5 Ways to Use Shadows in Your Paintings

The ability to capture a moment in time—whether it’s a cherished moment from the past or a yet-to-be-born one—is something that humans have long sought to do since the dawn of civilization. It started as a means of recording history, but when it became easier to take still photographs and film, we became more interested in seeing our lives as art.

Art is everywhere. It can be on a canvas, a canvas on a wall, on a wall, a painting in a museum, a painting hanging in a gallery. We often take for granted that art is something that can be viewed. While this is sometimes true, for those who enjoy the act of creation, art can be a form of self-expression.

We’ve all seen paintings and read history books, but to learn how they were made and how they were made to look and feel, we need to understand their construction. We do it the same way with books, writing, and the canvases on which they are painted. With each one of these, there are layers of creation and meaning.

A painting is a form of art that uses two-dimensional forms such as lines, marks, or pictures to make an image. A lot of people take a painting to be a picture made of paint on a canvas. Others, however, think of a painting as an artistic work of a work of art. Still, others think of a painting as a form of creative writing.

It is an artistic medium used to create visual art. The media used to create a painting can include painting with oil, acrylic, watercolor, collage, drawing, printmaking, and other such media. A painting could be created with any material and blend of materials, including pastels, pencil, ink, colorants, sculptures, and other related materials. A work of art may be created with any style or technique.

When thinking about painting, many people think about the use of shadows to create the illusion of depth in a picture. It’s a technique that has been used for centuries and was the first step in the “impressionist” movement. While it’s been used in painting ever since it’s not often talked about or taught. So, we are here to give you 5 ways to use shadows in your paintings.

  1. When you are creating a painting, you are aiming to create a likeness of what you want to paint. For example, if you want to paint a full moon in the sky, or an autumn scene with falling leaves, or a portrait of a woman, then you should be able to create a full moon in the sky, or an autumn scene with falling leaves, or a portrait of a woman. Shadows are the only means to ground and define the subject in the depth of a painting. From the earliest times, artists have sought to define their subjects by the use of shadows.


  1. As a painter, the trick is to find ways to ground the subject into the ground without making the canvas look like a flat plain. This isn’t easy, and it can get a bit tricky, but the use of shadows is a great idea.


  1. You can color, shade, or highlight your painting in a myriad of ways, but what about the invisible lines that connect one image to another? The most common is probably to use a maximum of two colors: a background and an “invisible” (or “faded”) ground, then paint in the foreground. However, if you want to create a sense of depth, you can try using shadows.


  1. For a long time, artists depended on the sun for their light. The sun’s natural rays were only used as a model for reflection in various forms and various levels of intensity. That is how painters found their inspiration in the light and their works of art!


And nowadays, artists are using shadows as a design element in their paintings. Shadows, both natural and artificial, are used to create an interesting composition.


Sometimes, using shadows as a design element in your paintings can be difficult, if not impossible. This is especially true if you are trying to create a painting that is on a smaller scale, like a miniature or tabletop.


  1. If you’ve ever looked at a painting and felt it was missing, you might have been experiencing painters’ block. A new study suggests that you need to use shadows to help convey feelings or emotion in your painting, so be sure to make use of shadows.
Art and its Homes, Main

How to Hang Art

There is the question of how to hang art, which is probably the most frequently asked question on this site and one that seems to arise every time I hang paintings or art. Sometimes the question is legitimate, and sometimes it’s just an excuse to ask a general question. But today, it’s a legitimate question. As you’ll soon see, there are a variety of different ways to hang artwork that work well and look good in your home, either indoors or out.

As a lot of people know, hanging art is an art in itself. It is not as simple as it looks. Sure, you can purchase a ready-made framed canvas and hang it up, but it will look very unnatural. If you want to do it right, you need to draw, design, and make the hanging of your own framed art.

All of us want to make our homes more beautiful and comfortable. Sometimes, simple things can make a big difference, like hanging art. The ability to hang art is a valuable skill that anyone can learn.

Last month, we looked at some of the tools and materials you can use to hang art. Today, we’re going to look at how to hang art on a wall. There are a few different ways to do this, but they all have three things in common: they’re all easy, effective, and fun.

For years, hanging art has been a simple, costly, and time-consuming process. Artists usually rely on experience to sell their art, which is mostly what I am doing with this blog. I will try to provide as many helpful tips, tricks, and information as to help you get that perfect hang.

Everyone sees art every day, but most of us don’t even think about how we hang it on the wall. For those who want to learn about wall-hung paintings, here are a few tips that you can apply. For one, wall-hung paintings tend to look better on a frame from FRMD or similar stores, as it makes it easy for the viewer to view the painting.

Since we were little kids, we’ve all dreamed about hanging pictures on our walls. It feels good to see what you’ve been working on for so long finally up on the wall. However, sometimes it can be difficult to find a good spot for it, and that’s where we can help. In this article, we’re going to show you how you can hang art on your wall.

When hanging art, there are a bunch of different ways to go about it. Are you going to use a framed gallery mount system? A flush mount? A foam core? Especially when you are hanging canvas prints up, you will need to understand the importance of the canvas hanging kit to help you carry out the process properly. If you don’t know, then you probably should. If you’ve got a friend or family member who can give you a hand, then why not ask? But if you’re doing it by yourself, then here are the tools you’ll need to get started.

There are two ways to hang art: free-standing and on the wall. Free-standing art is a great way to add some trendy style to your space, but if you’re looking for a different kind of art display, you can hang it on the wall. Unfortunately, if you’re looking to hang art on the wall, you will need to buy a few supplies and make some minor DIY improvements.

If you are reading this, then you are probably looking for an easy and well-organized way to hang art. We have often been asked to write an intro on this, and we can’t say enough about hanging up art on your walls. The first thing is to decide exactly what you want to hang. Are you looking for a gallery wall that fills your entire room? Or are you happy to pop up a few items on a small wall but are feeling a bit more adventurous?

It’s so easy to hang art on the wall these days. Where once you’d get up in the morning and decide to paint a room, today it’s much easier just to hang a few pieces of art. But where are you supposed to hang them? It always seems like the best option is to buy some special frames at a store. But sometimes you’d rather just DIY it.

Art and its Homes, Main

How to Clean Your Paint Brushes After Oil Painting

You have just finished painting your new masterpiece and are tired of scrubbing the paint off your brushes with dish soap. But you don’t want to get your paint all sticky again. Then you come here to learn how to clean your paintbrushes after oil painting.

Paintbrushes are an integral part of the oil painting process. Cleaning these brushes is of the utmost importance after you have finished your painting session.

Oil painting is one of the oldest forms of art, dating back to ancient Egypt. The technique involves applying oils to a canvas, usually a wooden panel or board, to create a work of art. The oil is then wiped off the canvas with a rag or brush to reveal the finished painting. Oil can be messy and can often drip down the canvas onto the floor, so it’s important to keep your brushes clean and free of oil.

Oil Painting is a beautiful art form, but it’s also messy (especially if you’re painting on a black background!) The thick paint and mediums used for oil paintings often leave a lot of unwanted residue on your brushes after each painting session. These paints and solvents can not only be difficult to clean, but they can also be harmful to you and your artwork.

Sometimes oil paints can get a little messy. This is especially true when you’re painting outdoors in the summer, and the sun is shining, or when you’re painting in a room where there is a lot of dust and debris. Oil painters have the hardest time with cleanup, but there’s no reason you should have to go through the same difficulties. Here’s everything you need to know about oil painting and how to clean your paintbrushes.

Have you ever taken a look at how paint is applied on your canvases and only then noticed how dirty your paintbrushes are? If you want to clean your paintbrushes, you should make a big mess and take care of them properly. If you don’t, you’ll likely end up creating strokes on your paint that will ultimately make your brush useless.

Brush cleanliness is the first step to getting beautiful artwork. The first step is brush cleanliness, which is to clean your brushes with a brush cleaner. Brush cleaner is available in any art supply store.

Cleaning paintbrushes after oil painting is important to keep your brushes in great shape. While it is perfectly okay to clean your brushes with regular solvent, some numerous chemical additives and surfactants can be used to keep your paintbrushes healthy and in good working condition. A properly cared-for brush absorbs magical oils that keep the bristles shiny and firmly in place.

After oil painting, you may want to remove the paint from your paintbrushes, so you can use them again. You can use soap and water or use cleaner, such as oil paint thinner. You must use a thin paint thinner to get rid of the paint from your paintbrushes.

Do you have that pile of old paintbrushes in the bottom of your studio? They just sit there, taking up space and making a mess. One day, you might need to grab an especially dirty brush, and if you don’t clean it between uses, it might not work as well when you do need it. You can use dish soap or warm water on a piece of cloth to clean paintbrushes. (If you want to save even more space, you can stick the brush in your dishwasher or the microwave if you only need to clean one at a time.)

One of the best ways to keep your brushes clean after you’ve finished a painting is to soak them in linseed oil, which is a type of oil paint. The best linseed oil is made from flaxseed and is available at any hardware store. It will keep your brushes alive and clean without causing any damage to the bristles. When you’re painting a full-sized canvas, the time of use is vastly different than when you’re cleaning paintbrushes. Since you are storing your brushes with their bristles facing backward, after you paint, you have to take time to turn them around and use a rag and some solvent to clean them.

Art and its Homes, Main

Preparing for Craft Fairs

The craft fair is a type of street fair that offers handmade products like pottery, glassware, textiles, and jewelry. It’s a way for craft entrepreneurs to sell their work to a broad audience of people in a variety of settings. The craft fair has become so popular that it has become a global event, with the Craft and Gift Association (CGA) reporting that there are more than 10,000 craft fairs in the United States today.

As many crafters know, preparing for a craft show takes several months of planning. It takes a lot of organization, constant trips to the post office to ship your items, staying abreast of the latest pop-up shop trends, and a lot of planning to get everything ready to go. However, the preparation doesn’t end once you get to the show. You still need to do a lot of work to get ready for the next show.

So, for those who like a little crunch in their craft show preparation, here are a few things that you can do to make your next show go smoothly.

  • Before you start planning your craft fair, you’ll need to decide where you’ll be pitching your wares. Your booth will need to be accessible to your customers at a central location that is easy to find and not overcrowded with other sellers. Once you’ve done that, you’ll need to think about how you want your customers to feel when they see your booth.


  • Starting a craft fair is a great way to showcase all of your creations, but it can be hard to know where to start. To start, think about how you want your customers to feel when they see your booth. At the craft fair, you’ll want to make it as personal as possible for the people who attend. This means creating a space that is just for them. Planning is very challenging, which is why it’s critical to start thinking about the customers you want to bring to your booth.


  • It’s that time of year again when everyone gazes at the sky, then turns their gaze towards the mall. For many, the mall is the ideal place to pick up some supplies and the best place to score the deals that will allow you to become the craftiest person at the show. In the run-up to your next show, it can be difficult to keep track of all the cool things you’re going to bring to the event. Starting with a simple list of items you plan to sell and working out from there can be a great way to make sure you’re getting everything ready before the big day.


Before you go to an event, make sure to prepare! Make sure to work out your budget and figure out the total cost of your craft table and how much you’ll spend on materials. A running list of materials you’ll need is a must for shows or fairs. When you go to a show, you never know what you’ll find. You may want to make an extra set of marbles for your fair piece, or you could find an old hand-stitched pillow to add to your table.


  • If you’re thinking of going to a craft fair, it’s a good idea to have a plan in mind. It’s not ideal to find yourself with nothing to eat or drink or with a lot of extra work to do, especially when you’ve paid for the booth space. You need to think about what kind of snacks you would like to have on hand during the fair, what you will be serving at the booth, and what kinds of drinks you’ll need to stock.


  • One of the biggest worries you’ll have when preparing to go to a craft fair is the weather. Luckily, there are a few things you can do to help you get through any bad storms. First, take a look at the forecast. The weather will be perfect most of the time, but there are some ideal times to start selling and some ideal times to end. The weather is a big factor in how successful your craft fair will be, so take a look at the weather forecast as early as possible. Also, it’s always a good idea to have extra supplies on hand. Appropriate materials like plastic containers, freezer bags, and plastic wrap are a must.
Art and its Homes, Main

Working With Clay: Things To Keep In Mind

What is clay? How does it work? Whether you’re a professional or a DIYer, clay is finding its place in the world. Millions use clay across the globe in manufacturing, art and crafts, landscaping, architecture, and many other areas.
The word clay is derived from the Latin word clavus, which means “claw,” as these rocks are commonly shaped in thin, claw-like formations. Clay is a non-porous substance that can be molded or shaped into various forms. When used to make pottery, it is called “clay.” When used in jewelry making, it is called “clay-fire.” When used in sculpture, it is called “clay modeling” or “clay sculpture.” When used in a building, it is called “Clay.” When used in sculpture, it is called “clay modeling.” When used in building, it is called “Clay.” When used in sculpture, it is called clay modeling or clay sculpture.
Clay is the main ingredient in pottery, as well as the building blocks for bricks, tiles, and other more intricate projects. In this article, I’ll show you things to keep in mind.
• Clay is a super absorbent material that is perfect for a variety of projects. Clay pots are inherently porous. When heated, they shrink and create a domed surface. This places your plants and soil directly on the hot clay, which can cause issues such as cool temperatures and lack of oxygen. Also, the clay can expand and contract over time, causing uneven temperatures and/or a pot that is too shallow for some plants or too deep for some plants.

• Clay is an extremely versatile material if used in the right way. After all, it is the most used material in the world and the ninth most abundant element in the Earth’s crust. Heat is essential to keep the clay in its natural state. If you take the clay that has not been heated and mold it into a statue, the statue will crumble due to the lack of heat. Molding clay without heat will almost always ruin the clay.

• Unlined clay pots will dry out faster than lined ones. This is because clay has a natural property that keeps moisture in the pot. With lined pottery, you can let the moisture escape by making a hole in the bottom of the pot. This is not a problem with unlined pottery, which is used for things like storing rice.

• Clay is the natural material that is used for pottery and other ceramic creations. It is fragile and susceptible to breakage during cutting, shaping, and firing. It also has a tendency to absorb the colors of other materials, making the piece look duller and older. So, make sure you have lots of knowledge when it comes to making clay pottery.

• When it comes to clay pottery, the most important thing to consider is the quality of the clay. The clay you use can alter the entire experience and end result of your project. One of the most important things to keep in mind about clay pottery is that the clay you choose can make or break the entire project.

• There are multiple different types of clay used in the production of clay pots. The most widespread type of clay is kaolin clay. It is clay that has small inclusions. These inclusions are not harmful, but they do affect the properties of the clay. These special properties can be used to make clay pots that can be used in many different pottery production processes.

• Clay pottery is a real art form all around the world, and a lot of people enjoy making their own pottery. To begin with, you need to have an idea of what you want to make, the type of clay you are going to use, the tools you’ll need to make it, and where you’ll be working.

For clay pots, you can use clay that is available locally and in the states, as well as imported clay that has been tested and is widely available.

• The most common types of pottery use glazes to add color and shine to the finished product. The colors used in glazes can be bright and striking, like the vibrant reds, oranges, yellows, and greens that are used to create vibrant and beautiful ceramics. They can be gentle and muted, such as the various pastel shades used.

Art and its Homes

Connecting the Dots – Learning More about Dot Art

Dot art is an emerging art movement that is characterized by the use of small dots to create drawings. This art form had been gaining popularity in recent years, thanks to the growth of the internet and the rise of DIY craft culture. The dots are generally applied using a small needle and can be placed on existing paintings as well as directly on the canvas. Typically made by gluing tiny dots of paint on an abstract, geometric background, it can be viewed as the digital age’s version of pointillism.

The focus on tiny details is what distinguishes dot art and makes it more than just a pretty picture. However, dot art isn’t just for experts: the simplicity of the painting process makes it a great art form for amateurs and experts alike. The result is an image that appears to be made of tiny colored dots but isn’t.

Tracing the Dot Art from the Past

Dot art is an umbrella term that encompasses all art that uses dot patterns for artful purposes. The earliest known dot art dates back to the Neolithic period, where early humans used ink and paint to create geometric patterns on cave walls. The more contemporary incarnation of dot art began in the 1960s when a Japanese artist named Kazuo Shiraga began creating art with dots of ink on paper. Soon, other artists followed suit, creating stunning patterns and images with nothing but dots.

The dot art style has its roots in the classic style of pointillism, which was popular in the late 19th century with the Post Impressionist movement. Today, dot art is characterized by intricate patterns, shapes, and lines formed by thousands of small dots—the more colors used in a piece, the more vibrant the final product. Although dot art is typically used on paper, the technique can also be used on other media, including fabric and walls.

Originally called “pointillism,” the dot art movement was made popular by Georges Seurat, whose painting “A Sunday Afternoon on La Grande Jatte” used tiny dots to create a scene of a Parisian park. Dot art has had a lasting influence on artists who work today, as they use the same technique to create art with a modern edge.

Here are other notable artists are known for this form of art:

  • Chuck Close – Chuck Close began creating his iconic portraits of people in the 1970s. As opposed to earlier artists who painted with paintbrushes or used broad strokes, Close used a technique called pointillism, where small dots of color are placed next to each other to form a picture. He then photographed the paintings from a close distance and created a grid from the resulting images. The final product was a large digital print of thousands of colored dots, which he then transferred to canvas. This digital process was a big change from how most artists made a painting.
  • Albert Dubois-Pillet – Albert Dubois-Pillet was born in 1853 and died in 1917. He was a French painter who is best known for his pointillist style. What is pointillism? It’s one of the two painting techniques (the other being Impressionism).
  • Henri-Edmond Cross – was born in Paris in 1856. He was widely noted for his artwork, which is characterized by the use of dot patterns, and he was a prominent member of the French avant-garde. However, he is perhaps best known for his artwork in the last decade of his life, when he became a devout Catholic and began painting religious subjects. His art, which he called pointillism, is characterized by the use of dots and dashes of colors applied in patterns, arranged in specific ways to achieve the different effect.

Is Dot Art Essential?

We’ve talked about dot art before and explored how it is a technique that evolved from pointillism, a painting technique developed in the 1880s. Although the art world was highly critical of pointillism when it was introduced in Paris, it eventually gained wide recognition and acceptance. It is also commonly used to create portraits and still-life paintings, which are some of the most well-known examples of this artistic style. Like other types of art, dot art has become a widely popular form of expression that is accessible to people of all skill levels—you don’t need to be trained to create epic dot artworks!